Hack the Box - A Writeup Analysis - Precious
We will be looking at the following write-up, and will be breaking down pieces bit by bit: https://read.infos3c.net/hack-the-box-htb-writeup-precious
When beginning any type of pentesting, it is potentially helpful to understand the typical “life cycle” of what is called the “Cyber Kill Chain” by Lockheed Martin. The steps in the chain are as follows:
Reconaissance: The first step in this so-called kill chain, this step typically involves the identification of a target, the collection of information from the outside looking in, determining potential entry points/vulnerabilities, and creating a general plan of attack and use of tactics.
Weaponization, also known as Intrustion: This step is typically defined by an attacker attempting to get inside a security perimeter and creating an attack vector, usually through the crafting or use of malware or malicious code.
Delivery: Once an attack vector has been opened, and applicable malicious payloads have been prepared the actual attack can begin in earnest. This step is fairly self-explanitory; the attack vector is used to deliver a directed attack, crafted specifically to abuse any opening discovered in the previous stages. How this stage proceeds will depend on the tactics decided on by the attacker in the previous stage.
Exploitation: This stage deals with the execution of the payload delivered during the Delivery stage. Effectively, the point of this stage is gain a temporary foothold inside the system through which a more tenable, long-term foothold can be discovered.
Installation: This stage details the installation and deployment of malware on an exploited system in order to create a long-term foothold inside of a system. This stage is also known as the “Privilege Escalation” stage in other variants of the CKC.
HTB boxes typically don’t proceed past this point, since the end of privilege escalation will usually end up with root ownership of the system (aka “pwning” a system), and discovery of the root flag, but for reference, I’ll include the next two steps below:
Command and Control: This stage details the manipulation of a system to hide the presence of an attacker/intruder, leading into the last stage.
Action on Objectives: Every directed cyber-attack has an end-goal, whether that be disruption, data encryption, data collection, etc.
Now that we’ve gone through this, it’s now time to look at the first steps taken in this write-up.
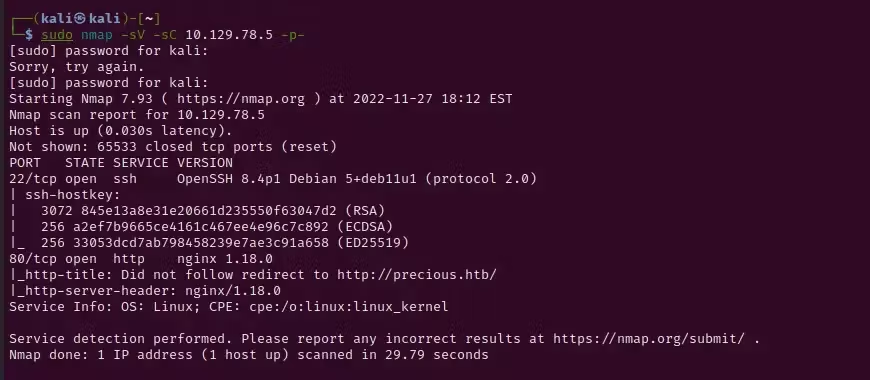
This user started with the following command:
$ sudo nmap -sV -sC 10.129.78.5 -p-Okay, so what is nmap?
Per the man pages for nmap:
Nmap (“Network Mapper”) is an open source tool for network exploration and security auditing. It was designed to rapidly scan large networks, although it works fine against single hosts. Nmap uses raw IP packets in novel ways to determine what hosts are available on the network, what services (application name and version) those hosts are offering, what operating systems (and OS versions) they are running, what type of packet filters/firewalls are in use, and dozens of other characteristics. While Nmap is commonly used for security audits, many systems and network administrators find it useful for routine tasks such as network inventory, managing service upgrade schedules, and monitoring host or service uptime.
Taking a look at the syntax/options being used here:
-sV: Probe open ports to determine service/version info
Fairly self-explanatory.
-sC: equivalent to --script=default
Essentially, the nmap command will run a set of scripts that it uses to provide more information about open ports on the target system. You can see the list of default scripts being run here
Finally, we have the IP address we’re targeting, followed by the -p- option.
-p <port ranges>: Only scan specified ports
For our purposes here, we can consider the -p- option as equivalent to -p0-65535, which allows nmap to scan ALL available ports, of which there are 65535.
In the scan, we’re seeing that Port 22, which is commonly used for SSH connections, and Port 80, which is commonly used for the HTTP protocol, are open on the target machine. More of interest, we’re seeing that the nginx software is being run on port 80, and the “http-title” script reveals a redirect to a domain, “http://precious.htb”.
Since trying to navigate to the IP results in a redirect to “precious.htb”, we need to place the domain as a host in the /etc/hosts file, which should act as DNS service for the local machine.
That being done, we navigate to the domain, which brings us to the following page:
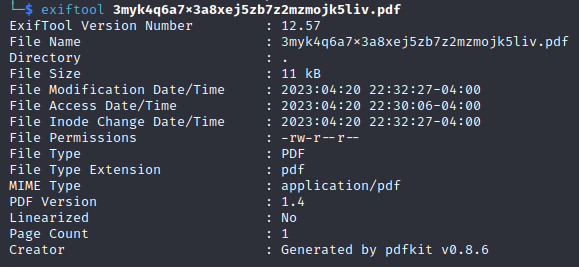
It appears that the webpage takes a URL and converts the webpage it receives into a PDF, which can be saved from the browser. In the write-up that we’re looking at, they’ve downloaded the PDF to their machine and used the exiftool to look at the PDF’s metadata.
Per the manpage for the exiftool:
A command-line interface to Image::ExifTool, used for reading and writing meta information in image, audio and video files.I’ll do a deeper dive on this tool at some point, to take a closer look at what it really does.
Exiftool reveals that the pdf was created by something called the pdfkit v0.8.6:
What is pdfkit?
Upon searching for “pdfkit”, I discovered that there appear to be multiple applications with that name. According to this site, this particular has to deal with with the Rubygems implemntation of the application. Rubygems, according to Wikipedia is:
RubyGems is a package manager for the Ruby programming language that provides a standard format for distributing Ruby programs and libraries (in a self-contained format called a "gem"), a tool designed to easily manage the installation of gems, and a server for distributing them.So, right away, we know that the application that is being used to convert the web page to a PDF is using the Ruby programming language.
Fortunately, that above site also has a brief explanation regarding how this exploit works. Why this exploit works is a bit outside of the scope of this deep-dive, so we’ll just stick with the basics of how to use this exploit to gain a foothold.
Looking at the page I’ve linked earlier, we get the following blurb:
=============
An application could be vulnerable if it tries to render a URL that contains query string parameters with user input:
PDFKit.new("http://example.com/?name=#{params[:name]}").to_pdf If the provided parameter happens to contain a URL encoded character and a shell command substitution string, it will be included in the command that PDFKit executes to render the PDF:
irb(main):060:0> puts PDFKit.new("http://example.com/?name=#{'%20`sleep 5`'}").command wkhtmltopdf --quiet [...] "http://example.com/?name=%20`sleep 5`" - => nilCalling to_pdf on the instance shows that the sleep command is indeed executing:
PDFKit.new("http://example.com/?name=#{'%20`sleep 5`'}").to_pdf # 5 seconds wait...Of course, if the user can control completely the first argument of the PDFKit constructor, they can also exploit the command injection as long as it starts with “http”:
PDFKit.new("http%20`sleep 5`").to_pdf=============


